Sunday, March 24, 2013

Photo Mojo

With such beautiful weather here in Texas... the kids and dogs can't resist playing outside. 
Here are a few shots that I took of Skye and Dusty, our pomeranian.
They are straight out of the camera and not edited at all.  
I LOVE how they came out! 


I love them so much, I am currently working on a layout with these photos! 
This uses the sun as back light...and I LOVE the over exposed look! 


Here is one with Front Light. 
OMG I love how it looks! 
I had her look down so the sun didn't shine directly into her eyes...and I love this pic!

My photo Mojo this week is to use the sun to your advantage.
Take a variety of photos with various angles using the sun as your light source.  


Saturday, March 23, 2013

It Is Officially SPRING!


And down here in Texas, it truly feels like it. 
Now I know, some of you up north probably think I am saying
 "Nana Nana HA~HA"...well...you're right! 
LOL>>>HA HA HA! 
 It feels sooooo good down here right now... the sun is shining and the
 the birds are chirping and the green leaves are starting to bud.  
UTTERLY GORGEOUS
(Sorry My friend Michelle... and all you northerners!)

It is finally my turn to share a project for the week-long 
Peechy Keen~Really Reasonable Ribbon Swap.
In honor of the Gorgeous Spring that is upon us here in Texas, 
I created a little altered project that I call:
"The Flowers in my Garden"

I started with the Peechy Keen Funny Flowers and 
Lady Bug stamps for this flower box.  
I used water color pencils to color them in and I glazed 
over the tops with crystal stickles.  I used mini 
2x2 photos of my kiddos to create little "seed packets" to go in the garden, too.
All my flowers and seed packets got hot glued to lollipop sticks that I had
 inked green or wrapped with green floral tape.  
I gave the flowers little "bow ties" using the March Ribbon Club assortment.
I created the grass using 1.5 inch moss jute ribbon and
 the soil using the 1.5 inch ivory jute ribbon.
I wrapped the whole flower box with one of my all time FAVES....
1.5 inch red gingham ribbon topped with natural hemp and and a button. 

I sure hope you enjoyed my little flower garden! 
Consider it my little "gift of spring" to all you up north! 
Have a WONDERFUL weekend! 
~Misty~
Don't forget there is are two $25 gift certificates up for grabs this week.  Comment on all the blog posts on The REALLY REASONABLE RAMBLINGS BLOG between 3-16 and 3-23 for a chance to win a $25 Really Reasonable Ribbon Gift Certificate and head over to thePeachy Keen Stamps Blog and comment on their posts too for a chance to win a $25 gift certificate for Peachy Keen Stamps!!
So head on over and start commenting!


Thursday, March 21, 2013

Go check out the RRR blog!

We have a week long cross-promotion going on this week with Peechy Keen Stamps!

not only will you find lots of gorgeous ribbon and stamp ideas, but there are TWO $25 gift cards up for grabs!  YES!  I SAID TWO!!!!

CLICK HERE to go to todays beautiful post...but make sure you go check out all of the ones from the whole week!


Wednesday, March 13, 2013

Hopping with RRR!


Welcome to the Really Reasonable Ribbon Blog Hop!
We have a great line up of projects and inspiration for you!  
If you arrived here from Vivian's blog, then you are on the right track!  If not, then you might want to start over at the beginning at the Really Reasonable Ribbon Blog and check out all the blogs along the way!  
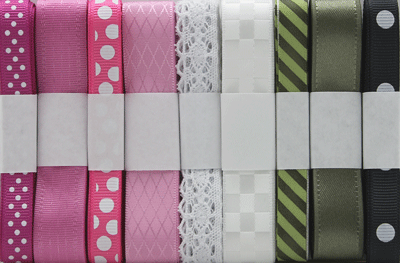
I absolutely love the springy mix that Bonnie put together for this month's Ribbon Club!  
These colors truly do make me think of a Sour Pickle! LOL

Here is the assortment...Isn't it Magnificent!!?


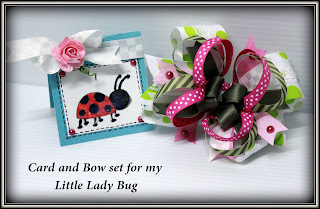
So of course, I had to make my "Bow of the Month" with the Ribbon of the month assortment!
So here is March's "Lucky Lady Bug"
I also used a Peachy Keen stamp to make the little ladybug for my mini card. 
***Next week will be a WEEK LONG feature of Peachy Keen Stamps mixed with Really Reasonable Ribbons!  You won't want to miss that!


Here is a close up of the bow itself.  I used all but 2 of the ribbons from the club assortment on this bow this month.  I LOVE how this turned out!  The pinks and greens are just magnificent together! 


Thank you so much for hopping along with us today!  Your next stop in our hop is at Ginny's gorgeous blog.  You are certain to find more wonderful inspiration there!  
And Have a Wonderful Hump Day! 

Monday, March 11, 2013

Memory Maze DT Reveal


Hi, y'all!  Happy Monday! I am sooooo excited to be sharing my very first post with you as a Memory Maze Design Team Member. (Although it is a little late) 
I am not in tune with Aussie time...I think I will put a big alarm clock on my phone for my next posting time to remind me!  

"Kisses"
My first project that I want to share with you is my layout "Kisses".
The kiddo in the center is my youngest daughter getting a kiss sandwich from her older sister and her BFF.  These girls are so super sweet and always happy!  I was so pleased with the fact that I caught this "Kiss Sandwich" on camera!  Yes...they actually called it that! Silly Girls! 


Here are a couple of close ups:
Hint...for theses black pieces, I did a "cheaters" version...LOL.
I used a black sharpie marker and colored the pieces, then used Glossy Accents to go over everything and sprinkled fine grain glitter on everything before it all dried.  
SUPER easy way to get a major impact! 


Memory Maze Supplies:
Other Supplies:

 ................................................................................

Formy next project, I decided to try my hand at the 3D stackums.  I am not much of a card maker...AT ALL.  The 3D stackums made this an easy task!  I actually enjoy fussy cutting, so these things are right up my alley!  No major thought process involved...just cut, stack, and send! 
LOVE how this turned out! 


Memory Maze Supplies:
Other Supplies:
 ................................................................................

"It's a Wonderful Life"

My final project uses quite a bit of Memory Maze chippies! 
And I am TOTALLY in love! 
I used glod glitter acrylic paint and painted the corner and the swirl.
I gave them both a double coat of paint for extra glitter.  Yes...I am a glittery kind of girl! 


For the bird cage, I painted it black, thenI went over with a light layer of the gold glitter paint. I wanted to achieve a distressed wrought iron effect.


I used the "It's a Girl" mini word phrase and clipped off the word Girl.  
I only wanted the "It's A" to complete my title.  


Memory Maze Supplies:
Other Supplies:

I hope you have enjoyed my projects today, and I hope I have inspired you! 
I am about to head over to the Memory Maze store and go shopping..maybe you should too! Even if only to take a look and make yourself a Wishlist! 
Have a wonderful Week!
Misty Willis

Monday, March 4, 2013

Hippity Hop!


Easter is on it's way!
Can you believe that in just a few short weeks that elusive Bunny will be making his way through everyone's yard...dropping little "treats" along the way!  
It seems like just yesterday that Big Guy in Red was sneaking into everyone's homes 
and stealing cookies and milk!  ;) 
I love the holidays because they are the few days a year that my family gets together...but,
 most of all...I love them because they give me a reason to GET CRAFTY! 

I have a serious ribbon obsession, y'all. 
 SERIOUSLY.
You know how I know it's bad?
I was browsing through the RRR STORE and found a ribbon assortment that matched the ruffled ribbon that I love so much.  I immediately started planning my Daughter's Easter ensemble...in DECEMBER!  I didn't even have a dress yet!  I just knew what ribbons I wanted, and would worry about finding the dress later!  lol..yep...it is BAD. 
Most people match ribbons and accessories to their clothing...NOT me...
I match clothing to the ribbons I want to use!  
And for her Easter ensemble, I wanted brights.  Yep...yellow, pink, and orange.  LOVE those colors together!  
Here is her basket that I made: 
I used:
ruffled ribbon in yellow, azalea, sherbert, and orange.
**NOTE...I DID NOT use any of the beads. My original intent WAS to use them, but I loved the basket so much that I just didn't feel like I needed to add them :) 

Once I had selected my ribbons, I started hot gluing row by row to the basket.  
I just overlapped the layer just enough so that you could not see the basket between the rows...and started creating the ruffle effect. 


You think I left it at that????
ABSOLUTELY NOT!  
Of course I had to make a bow!  LOL
Here is the bow that I made to match:


And to help you finish up, refer to>> this Korker Bow tutorial <<
I used the:
 3/8 satin ribbon fairy assortment 

Here is the happy little girl that LOVES her EasterBasket, bow, and the dress that we got lucky to find! 
Oh...and I had to snap a few photos with her and the bunny flop!  


I hope this has inspired you to get crafty! 
Have a Great week!