Monday, January 28, 2013

Just Smile!


When I received my Main kit from 3 Scrappy Boys in the mail, I knew it would be PERFECT for scrapbooking those photos from a mini session I did with my kids just after Christmas.  The colors were perfect, and it is so versatile either  masculine or feminine photos.  And the embellies that Heather included were the perfect accent to this layout of these 3 scrappy boys of mine!  It is very rare that I can get them to smile!  Just take a look at that runt on the end....is that even a smile?  I think it is more of a smirk! LOL
Boyssmile
I like to add in different mediums to help add interest to the layout.  I used gun metal grey spritz along with some resist ink. 
TIP>>>  I used a Q-tip dipped on my ink pad to make all the little dots you see in yellow.  SUPER easy and most of us have Qtips on hand at all times!  
I hope I have ispired you! Have a super creative week!

Friday, January 25, 2013

Foto Mojo Friday!

Hi everyone!  Happy Friday!
I am looking forward to a fun filled weekend of basketball!  yay!  LOL

When Paula at Back Porch Memories e-mailed me and asked if I would be interested in joining her team...I was ecstatic!  I LOVE that place!  Of course I said YES!
Well, I have been assigned the "Photo Mojo" part of the forum.  Basically, I have to inspire the community to take pictures.  Well, that was right up my alley!  I love photography!  And Lord knows I spend enough time browsing the web stalking the amazing talents of professionals such as Karen Russell!
My thoughts for the forum are to issue a weekly mini tutorial or lesson along with a "Homework Assignment"  I am so excited!  Each Friday I will issue a New assignment, so keep a look out! 
Today, I want to share with you the very first challenge that I am issuing to the community over at Back Porch Memories.

My challenge is to:
 Use your camera phone to take an amazing picture of something OTHER than a person. 

Sounds easy enough, right?  Well, come on over and join us then!

Here are a few of my examples:
**These were taken last year...I WILL be playing along also, which means I will be capturing a fresh new I-phone photo!


I sure hope to see some of you come join us on the Back Porch and play along with the challenges! 
Have a Fantabulous Weekend!

Monday, January 21, 2013

My Feelings are Sad...

And that is just too stinkin' cute not to scrapbook! 
I used the Main kit from 3 Scrappy Boys featuring the Pink Paislee Portfolio Collection to document this bitter sweet moment with Skye.
We were at the park in the summer and I was taking a lot of pictures.
I guess that I had hurt her feelings in some way, because she went from a super happy smiling little girl to this! :


And all she would say to me was, "My feelings are Sad"

Awwww!  Of course that tugged at my heart strings....but this expression was too cute, so I HAD to take another picture to remember this day! LOL
Here is the kit that I had the pleasure of designing with:


You need to head over there and get your kit before they are all gone!
Have a magnificent day!


Monday, January 14, 2013

Happy Birthday and a frame...


Good Morning and Happy Monday to you all!!!
Today is January 14th.  Today, I have officially been a Mommy for 16 full years.
Today, my oldest son turned 16, and I am still in disbelief.
Happy Birthday to my NOT SO LITTLE Baby!

Just wanted to share that moment with all of you!!!
Now, are you ready for Beauty?
Well, here is a little project that I did using a 5x7 photo frame that my husband won in a white elephant gift exchange over the holidays:


Here is a photo of the original frame.  Nothing special...just a 5x7 black wooden frame.
I had no real use for it, but I love frames...any shape, size, color...I can't resist a picture frame! It is a weakness of mine!  So, I couldn't get rid of it...but needed to find a new use for it.

 So, I "Put my thinking cap on" and came up with a plan!   I pulled out my kit from 3 Scrappy Boys featuring the Pink Paislee Portfolio Collection and I set to work! I cut the bottom left portion of this paper in order to keep the stars and the red line that resembled notebook paper.
I cut it the same size as the original mat, because I completely removed the mat, replacing it with the paper only.  See how it looks like a sheet of notebook paper now?  
When it was the proper size, I put it into the frame and replaced the backing.  that part is finished.  Now comes the fun part!  Decorating!  I cut four small banners large enough to hold the letters "n-o-t-e" and I inked the edges of the banners.  
I used the American Crafts DIY Thickers that came in the Main kit from 3 Scrappy Boys.  These have a peel off top that allows you to use any finishing material of your choosing.  I used some Flower Soft glitter dust from a previous Product Swap that Bonnie did with Our teams.  It is perfect for these thickers!  I simply applied a generous amount of Flower Soft, pressed it into the thicker, and shook off the excess.


Next I gathered a few more materials. I got my handy dandy Hemp from the RRR store.  I used the blue and yellow from this assortment:
I got my photo bars metal embellishments from Momenta:

And of course some hot glue and I put it all together.  I made a hanging banner on the photo bar and I hot glued it all to the outside of that plain old photo frame. Here is an up close photo of the banner:
And finally, I got a small dry erase marker and I attached it to the frame using the hemp cord so that it doesn't get lost.  This entire project took about 20 minutes, and in the end, I had a super cute dry erase note board! I LOVE this little thing!  
I think I will keep it on my desk and maybe change out my "quote of the day" or even use it to write my "wish list" on!  LOL.    I hope I have inspired you all to get crafty today. And remember...Have a Beauty FULL day!  Thanks for visiting today!

Sunday, January 13, 2013

We R~R~R~ Hopping!~

Welcome to the First Hop of 2013!
Really Reasonable Ribbon Has a great line up of projects and inspiration for you!  
If you arrived here from Vivian's blog, then you are on the right track!  If not, then you might want to start over at the beginning at the Really Reasonable Ribbon Blog and check out all the blogs along the way!  
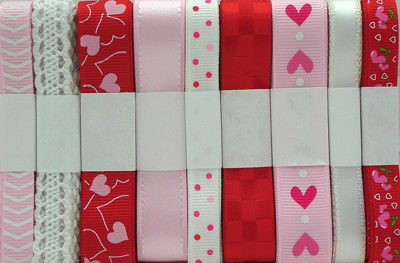
I absolutely loe the Valentine mix that Bonnie put together for this month's Ribbon Club!  
Te red/white/pink mixture sends all kind of messages of "LOVE"! lol

Here is the assortment...Isn't it Magnificent!!?


So of course, I had to make my "Bow of the Month" with the Ribbon of the month assortment!
So here is January's "Berry Sweet" Bow Valentine bow and clippies:


Here is a little snapshot of me with one of the matching clippies in my hand.  
I used little strawberry heart shaped buttons to match the ribbon.  

The pic of my model showing off the bow/clippies came out very blurry since it has been so rainy and dreary here.  So I do not have a model, unfortunately!
Thank you so much for hopping along with us today!  Your next stop in our hop is at Ginny's gorgeous blog.  You are certain to find more wonderful inspiration there!  Have a fantastic day! 

Tuesday, January 1, 2013

Using old Stash


I was lucky enough to be on 3 design teams this past year, and WOW! That was truly an honor. 
I am saying good bye to two of those teams, and hopefully will find one or 2 to fill those spots.
Until then, I will be digging into my large stash of goodies that I HAD to have, but have not yet been able to use!  I have been able to play these last couple of days...and I even have a couple of layouts that I want to share!

This first one is using My Mind's Eye.  Mostly So Sophie and Lost and Found collections.
Two of my FAVORITE collections from MME EVAH!
Had to have...never used! LOL
This is my youngest munchkin with Santa. 
Here is Joy to the World: 
 I used this sketch from the MME blog as my inspiration:

This second layout is using the Crate Paper Toy Box Collection.
Yes...another one of those collections I HAD TO HAVE and never used!  
I LOVE LOVE LOVE how this layout came out though!
This is my 3 boys all pointing their Nerf guns straight at ME!!!
Yes, I staged the photo for scrappy purposes, but this REALLY HAPPENED! 
We were having Nerf Wars with the Nerf guns they all got for Christmas last year and they all ganged up on Mom!  I was on the ground laughing, and when I looked up...this is what I saw...FOR REAL!!!  lol
Here is I NEED A HERO:

I have had fun digging into old stash!
The challenges over at Back Porch Memories helped get me to do it!!! 
I was excited when I found some of my favorites that I forgot that I had! LOL
Who knows...I just may be able to use up more stash soon! 
I am going to play along with the Swirlydoos Ultimate Designer Challenge.  Now, I don't expect to win anything, although it would be nice!  I do, however, expect for it to challenge me and give me the creative inspiration that I need to start 2013 out right!  
Wish me luck! 

First RRR Challenge of 2013!


And what a FANTASTIC challenge it is!  Bonnie had a GREAT idea!

The theme for Challenge #63 is My New  Toys & Ribbon Theme.  Be sure to let us know what your new item is in your blog post.
Show us what new goodies you received over the holidays (or what new goodies you purchased for yourself!)  Die cutting machines, new stamps, papers, embellishments, ribbon.....  Whatever it is, break it out and let's play! 
Create a card, layout, multi media piece, tag, ATC, hair bow, you name it. Just be sure to follow the theme above and use ribbon/lace or trim somewhere on your project.
Head over to the RRR Blog for the rest of the details and play along!

Here is my example: 

I created this using some October Afternoon goodies that my good friend Michelle sent to me for my Birthday.  I LOVED this photo of my son dressed as JFK...and these goodies set it off perfectly! 
Thank you Michelle!!!!
I also used Buttons and hemp from the RRR store...I love Bonnie's embellishments!

Ok...so you know the challenge, you've seen my example, go get crafty and submit your entry!! 
Have fun and good luck!
OH OH OH!!!!!  Almost forgot!!!!
Really Reasonable Ribbon is THREE YEARS OLD!!!!!!
YAY YAY YAY !!
(and I have been with her for 2 of those! How luck am I!!!!????)
go check out Bonnie's magnificent Blogoversary give away!
Here is a sneek of it!  
 
THREE GIFT CERTIFICATES
to Really Reasonable Ribbon!!
This way you can select exactly what you want.
 
 
There will be one $50 gift certificate and two $25 gift certificates which will be given to three random winners.

GO NOW AND ENTER!!!!

Thursday, December 13, 2012

Hopping Along!


Hi there everyone!! 
Welcome to the December edition of the Really Reasonable Ribbon Blog Hop!
If you came to my blog from Vivian's blog then you are on the RIGHT TRACK!  If not, then you might consider starting over at the beginning at the Really Reasonable Ramblings Blog and make your way through.
It will be worth your while!

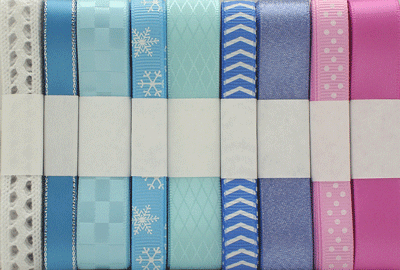
Check out this Gorgeous Assortment that Bonnie has put together for the Ribbon Club!
I absolutely adore the whimsical look of this assortment!  it made me think of snow men and snowflakes!  LOVED it!   I knew immediately that it would make perfect winter bows!  I also added in super adorable little snow~girls and viola...
The PERFECT SNOW DAY BOW!
Now...snow does NOT happen in Texas often, so this is the closest we will get!
 

OMGoodness!  I am in LOVE with this assortment!  I made two Big Ol'e TEXAS bows and then....with the remaining 3/8 inch grosgrain ribbon and a little extra tossed in for good measure, I made a Big Ol'e TEXAS sized korker bow!


I Hope you have enjoyed my TRIPLE bow feature this time around! 
OH...and if anyone is interested, I am now selling my bows. 
I have put a few on my facebook page.  YES, I will ship!
Just click on my facebook button on the right side of my page and friend me.  Then you can view my bows.  
These three will be available for purchase also.
If you have a special outfit you would like to match ribbon to, I can do that, too! Bonnie has a magnificent assortment of ribbons in the RRR store!  Go take a look and we can custom design your bow!

Now it is time to hop on over to Ginny's blog to take a gander at her inspiration!  
I'm sure you'll love it!
Thanks for visiting and have a magnificent week!

Tuesday, December 4, 2012

Good Bye "35"


Good Morning Ya'll!!
Yes, Today is my Birthday. 
I don't FEEL a year older.  Hopefully I don't LOOK a year older.
But I am.
And since my post at Really Reasonable Ribbon fell on my own birthday, I thought I would do a layout telling my 35th year good-bye, and tell "36" that I am looking forward to it!  LOL

I had read somewhere that scrap booking is great, but if YOU are not in any of the albums, then how will your kids remember YOU.
That has been exactly how my albums were looking.
FANTASTICALLY GORGEOUS, but I was no where in them.
SO, all year long, I took photos of myself.
And here is a collage page of ME at 35:


And here is a close-up of my title work:
I used 1 1/2 inch White Wrinkled Ribbon to help create focal interest for the title.


I used the clock piece to show that time is ticking away!!!  LOL
Purple is my favorite color, so logically, the main color of my layout about ME is my favorite color.
My journaling about my year is hidden behind the layout.  It is a lot of journaling, so I didn't want to put it on the front, it would have been more than the photos! LOL
I hope I have inspired you to create something today!
But most importantly, I hope I inspired you to take photos of YOURSELF.
Your kids and loved ones will want those someday, whether you do or not.
Thanks for visiting us today!
Have a FANTABULOUS day!

Monday, December 3, 2012

Magic Happens...

Happy Monday to Y'all!  Misty here today, and
I Can NOT BELIEVE that it is December already!
Tomorrow is my 36th Birthday...I don't think I was 35 long enough!  I can't have been a year already!  LOL  UN~BELIEVABLE!

As unbelievable as that is, I needed to focus on something that IS believable.
The MAGIC of CHRISTMAS
Now THAT is believable!
It is all around.  The sounds, the smells, the smiles. Love is all around us during this time of year.
Young or old, we are never too old to believe in the magic.

Here is a layout I did focusing on that magic.  I took my munchkins to visit santa Clause, and they all sat on his lap...EVEN the sixth grade girls! Aubrie and her best friend didn't even put up too much of a fight.
For this layout, I wanted to go clean and simple.  Because, we all know, the simpler we can go during the holidays, the better!  I used minimum supplies, for a maximum impact.
All I used for this layout was:
Just Because 200 
Holiday's and Events Itty Bitty Vellum Box Set
Amaretto PowderPuff Chalking Inks
Really Reasonable Ribbons
A little bit of paint and cardstock tossed in for good measure and VIOLA!
a simple but impactful holiday layout:

Magic Does happen when you least expect it. These photos prove that.  I love being able to look back on photos and see how sweet my kiddos once were.  :-) 
I hope I have inspired you in some way today!  
Happy Crafting, and have a 
WONDERFULLY MAGICAL HOLIDAY SEASON!

Sunday, December 2, 2012

Club Q Re-Do!

Happy Sunday Y'all!
I am here today to share with you my Club Q re-do's!!!
These were supposed to post before Thanksgiving, and for some reason, Blogger FAILED me!  
But, here we are today, trying again!

I used the kit for 12x12 layouts rather than cards and ornaments...the layouts better suite my preferences and I am in LOVE with the collection! 

First up is my Christmas layout.  I used an assortment of pocket sized photos to create this layout, problem was, the colors of my photos did not match my products that I wanted to use.
SOLUTION:  I printed them all in black & white instead and viola!  Perfect match!


My next layout features autumn photos.  
YES, this is from the same kit!  I just tossed in splashes of orange rather than the pinks and it transformed to the autumn look!
You'll notice that in both of my layouts, I used the elements for the paper ornament as ribbon slides instead and then just embellished them.


 for both layouts I used lots of Powder Puff inks.  I used Very Berry, Mocha Mama, and Midnight Confessions to help accent my paper and vellum edges in all the right places. I tossed in extra ribbon and hemp from my stash to go along with the beauties that came in the kit, and wow...what gorgeousness it created!  I still have plenty more materials left from my kit so that I can create more wonderful projects!  Make sure you get your kit before they are all gone!
Thanks for visiting us today!  Hope you have a wonderfully Blessed Thanksgiving!

Materials:
flowers
metals


Wednesday, November 14, 2012

Santa Bow Tutorial

***Please click here for the Really Reasonable Ribbon Hop***
Good Morning!!!
Remember this super duper adorable little girl from yesterdays hop???
LOL...well...we aren' focusing on her...we are focusing on the bow in her hair!
If you can make individual bows, You can make THIS bow!! 
 Here is a photo of your materials...the only thing missing from the photo is the ribbon slide that I used for the center of the bow.  
Materials:
cotton crochet thread, stiffen stuff spray
scissors, hot glue and a lighter to heat seal your ribbon
your clip of choice ( I use french clips)


Now, once your have your material gathered, you will begin your bow.  
If you click on each image, it will have instructions for you for each step along the way along with the matching photo.  **You will notice a round ribbon slide in these photos, only because Dummy Me ran out of squares before I remembered to take photos!  I do recommend the square ribbon slide...it makes the look of Santa's belt much more accentuated.


And as always, if there are still ANY questions, please feel free to ask and I will help in any way that I can!  Have a wonderful Wednesday!!
Misty