Wednesday, November 14, 2012

Santa Bow Tutorial

***Please click here for the Really Reasonable Ribbon Hop***
Good Morning!!!
Remember this super duper adorable little girl from yesterdays hop???
LOL...well...we aren' focusing on her...we are focusing on the bow in her hair!
If you can make individual bows, You can make THIS bow!! 
 Here is a photo of your materials...the only thing missing from the photo is the ribbon slide that I used for the center of the bow.  
Materials:
cotton crochet thread, stiffen stuff spray
scissors, hot glue and a lighter to heat seal your ribbon
your clip of choice ( I use french clips)


Now, once your have your material gathered, you will begin your bow.  
If you click on each image, it will have instructions for you for each step along the way along with the matching photo.  **You will notice a round ribbon slide in these photos, only because Dummy Me ran out of squares before I remembered to take photos!  I do recommend the square ribbon slide...it makes the look of Santa's belt much more accentuated.


And as always, if there are still ANY questions, please feel free to ask and I will help in any way that I can!  Have a wonderful Wednesday!!
Misty

Tuesday, November 13, 2012

Quick Quotes and Clear Scraps together!

***PLEASE SCROLL DOWN FOR THE REALLY REASONABLE RIBBON HOP***

What a wonderful combination of two companies!  These products fit so very well together!  For my project, I used the Lacey Mixable 8x8 album from Clear scraps along with the Cracklin' Rose Collection from Quick Quotes.   I admit, I have never done one of these albums before this, because I just prefer to work on my 12x12 layouts for my albums.  This was a nice change from the norm and I LOVED DOING IT!

I started with covering my chipboard pages with the paper from Quick Quotes.  I knew that I wanted those completely covered so that I could start my embellishment process.

My cover page of my album is kind of plain when it stands alone... just the work JOLLY and a wreath made from pine-look pipe cleaners.    BUT...when the album is closed, the first page looks gorgeous!  You can see the velum poem peeking through...and the flowers  I love the way the pages together create a masterpiece!

I used the vellum poem "Christmas" and I inked the edges with Limeade Powder Puff Inks.   I tossed in some flowers and leaves to help adorn the page a bit.
I went page by page, adding vellum, inks, flowers, paints and photos.  I chose to use a random assortment of my favorite photos from Christmases past. 
The chipboard 8x8 Christmas tree assortment was one of my favorite additions to my beautiful album!  
Below are the pages of my album....each one different, each one unique. This was truly one of my most favorite projects ever!


By the time I had finished the album, I realized that I had created a masterpiece that I will cherish for years to come!
Thank you for taking time to look at my project today!  Have a wonderful week!

Products:
Lacey Mixable 8x8 album from Clear scraps
Cracklin' Rose Collection from Quick Quotes
chipboard 8x8 Christmas tree assortment
Christmas vellums
Powder Puff inks
Birthday Bag o Chips


Hop Along with RRR!

Hi there everyone!! 
Welcome to the November edition of the Really Reasonable Ribbon Blog Hop!
If you came to my blog from Vivian's blog then you are on the RIGHT TRACK!  If not, then you might consider starting over at the beginning at the Really Reasonable Ramblings Blog and make your way through.
It will be worth your while!

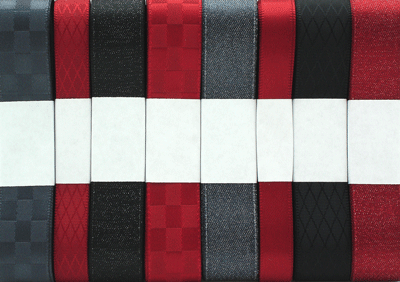
Check out this Gorgeous Assortment that Bonnie has put together for the Ribbon Club!

I absolutely adore the elegant look of this assortment!  I knew immediately that it would be perfect with a touch of white tossed in!  I also added in a yummy~licious looking candy cane and viola...
The PERFECT CHRISTMAS BOW!

  
FRONT VIEW:

SIDE VIEW:

And just because I am IN ABSOLUTE LOVE with the Christmas Holiday and all things Santa... I have been dying to make a santa inspired ruffle ribbon bow!  
So, here is my munchkin wearing her Santa Bow: 

I used the charcoal glitter ribbon from this month's assortment for the center "belt".
The more I look at this bow, the more I want to make more of them!  
It was  so easy and suuuuuper duper adorable!

I Hope you have enjoyed my double bow feature this time around! 
And...just for fun...and a little Christmas bonus...
I will do a photo-tutorial on the Santa Bow tomorrow! 
Make sure to come bak here or to the RRR blog for that! 
Now it is time to hop on over to Ginny's blog to take a gander at her inspiration!  
I'm sure you'll love it!
Thanks for visiting and have a magnificent week!

Thursday, November 8, 2012

Club Quick Quotes

Happy Thursday everyone!  It has been a LOOOOONG week for me already!  

Today, I want to share with you a  little Christmas itemthat I did using the November Q-Club kits and some of my handy dandy Powder Puff inks!

This first project is a stocking.  Just a paper stocking of course, but functional nonetheless.
Here is a close up of the flowers.  You can see that I have used ample amounts of maraschino cherry powder puff ink on these flowers. 
  You can also see in this photo that I have used green with envy and blue moon inks to accentuate the stocking and its top "fluff" portion. 

Here is the paper stocking completed.  It is fully functional and can be used as an alternative to a holiday card, or as gift card holders, or even just to give out as a class gift before the holidays to all of your munchkin's friends!
I sure hope this inspired you all today to get busy creating! 
Thanks for visiting!


Materials used:

Sunday, November 4, 2012


***Scroll down for the Quick Quotes/Helmar Blog Hop***

Hi Y'all!  And Happy Sunday!
Today I want to share with you the first of my annual hand made ornaments.
Every year, I make a few ornaments for family, friends, and of course...myself! 

This one is my "Country Rose" ornament.
All I do is fill the inside of the glass ornament with various lengths of ribbons.
Then I put the hanger top back on and decorated the outside. 
White seam binding makes a nice contrast on the top of the ornament secured with a golden button and dark brown hemp while red plaid ruffle ribbon creates the loop holder. 
 
I hot glued this jute rose to the top of the ornament and voila...a super simple Country Christmas Ornament to keep...or to GIVE!
 I hope I have inspired you today with this super simple ornament idea. 
Bonnie at Really Reasonable Ribbon has THE BEST RIBBON selection ever...so go visit her!
Go pull out your ribbon and get to creating today!